This article describes the steps required to gather the information required to configure billing data access for AWS accounts and recording the details to use when adding accounts to Buttonwood Central for invoice processing.
Note: Buttonwood does not modify any billing data and only reads the data provided.
To enable Buttonwood to access your AWS account information, AWS needs to be configured to output billing data into an S3 bucket. Buttonwood will collect the billing data from the S3 bucket using a read-only IAM role and process the data.
AWS provides two methods for generating the billing data:
- Cost and Usage Reports
- Detailed Billing Reports - This is a legacy feature but is still supported by Buttonwood. AWS accounts which don't yet have Detailed Billing Reports can no longer enable this option.
The configuration process below must be completed for each separate AWS account that you wish Buttonwood to access. Once configured, there are no ongoing actions required.
To perform the configuration process, you must log in using your AWS root user credentials.
Prerequisites
- Administrative access to Buttonwood Central with Insights role
- Administrative access to AWS root user credentials
Record the AWS Account ID
- Log in to the AWS Management Console
https://console.aws.amazon.com - From the top right-hand navigation pane, click your username to bring up the menu

Record the account number which appears next to My Account - The account number also appears under Account Settings when clicking into My Account

Create an AWS S3 Bucket
- Log in to the AWS Management Console
https://console.aws.amazon.com - Navigate to Services > Storage > S3

- Click +Create Bucket
- On the Create bucket - Name and region screen, enter the following details:
- Bucket name: A globally unique name for this bucket
- Region: The region in which to create the bucket

- Record the Bucket name and Region
- Click Create
Note: All other options should remain as default
Enabling Cost and Usage Reports
The following describes the steps required to configure AWS Cost and Usage Reports. This is the recommended configuration over the legacy Detailed Billing Reports.
- Log in to the AWS Management Console
https://console.aws.amazon.com - From the top right-hand navigation pane, click your username and select My Billing Dashboard

- Navigate to Cost Management > Cost & Usage Reports

- Click Create Report
- At the Create Report screen:
- Provide a Report name
- Tick the checkbox Include resource IDs
- Tick the checkbox Automatically refresh your Cost & Usage Report when charges are detected for previous months with closed bills

- Click Next
- On the Delivery Options screen, under S3 bucket, click Configure
- On the Configure S3 Bucket screen, select the AWS S3 bucket which was created earlier

- On the Verify policy screen, a default policy is applied, which allows AWS to write billing data files into the selected AWS S3 bucket
A sample of the policy is as follows:{ "Version": "2008-10-17", "Id": "Policy1335892530063", "Statement": [ { "Sid": "Stmt1335892150622", "Effect": "Allow", "Principal": { "AWS": "arn:aws:iam::386209384616:root" }, "Action": [ "s3:GetBucketAcl", "s3:GetBucketPolicy" ], "Resource": "arn:aws:s3:::<bucketname>" }, { "Sid": "Stmt1335892526596", "Effect": "Allow", "Principal": { "AWS": "arn:aws:iam::386209384616:root" }, "Action": "s3:PutObject", "Resource": "arn:aws:s3:::<bucketname>/*" } ] } - On the Verify policy screen, tick the option I have confirmed that this policy is correct

- Click Save
- On the Delivery options screen, select the following options:
- Time granularity: Daily
- Report versioning: Overwrite existing report
- Enable report data integration for: Leave all options unchecked
- Compression type: ZIP

- Click Next
- At the Review screen, validate the configuration

- Click Review and Complete
Billing data will now commence generating, however it may take up to a day for billing files to appear in the configured AWS S3 bucket - At the AWS Cost and Usage Reports screen, select the report which was just created

- Record the following:
- S3 bucket
- Report path prefix
Enabling Detailed Billing Reports
The following describe the steps required to configure Detailed Billing Reports. Cost and Usage Reports is recommended as this is a legacy feature of AWS.
These steps are not required if Cost and Usage Reports have already been configured.
- Log in to the AWS Management Console
https://console.aws.amazon.com - In the top right hand navigation pane, select your username and select My Billing Dashboard

- Navigate to Preferences > Billing Preferences

- Under Detailed Billing Reports, tick the option Turn on Detailed Billing Reports

- Click Configure
- On the Configure S3 Bucket screen, select the AWS S3 bucket which was created earlier

- On the Verify policy screen, a default policy is applied, which allows AWS to write billing data files into the selected AWS S3 bucket
A sample of the policy is as follows:{ "Version": "2008-10-17", "Id": "Policy1335892530063", "Statement": [ { "Sid": "Stmt1335892150622", "Effect": "Allow", "Principal": { "AWS": "arn:aws:iam::386209384616:root" }, "Action": [ "s3:GetBucketAcl", "s3:GetBucketPolicy" ], "Resource": "arn:aws:s3:::<bucketname>" }, { "Sid": "Stmt1335892526596", "Effect": "Allow", "Principal": { "AWS": "arn:aws:iam::386209384616:root" }, "Action": "s3:PutObject", "Resource": "arn:aws:s3:::<bucketname>/*" } ] } - On the Verify policy screen, tick the option I have confirmed that this policy is correct

- Click Save
- On the reports list, select the following reports:
- Monthly report
- Detailed billing report
- Detailed billing report with resources and tags

- Click Save preferences
Billing data will now commence generating, however it may take up to a day for billing files to appear in the configured AWS S3 bucket
Granting IAM Access to Billing Reports
- Log in to the AWS Management Console
https://console.aws.amazon.com - Navigate to Services > Security, Identity, & Compliance > IAM

- Navigate to Access Management > Users

- Click Add User
- On the Add user screen, enter the following details:
- User name: A name for the user
- Access type: Select Programmatic access

- Click Next: Permissions
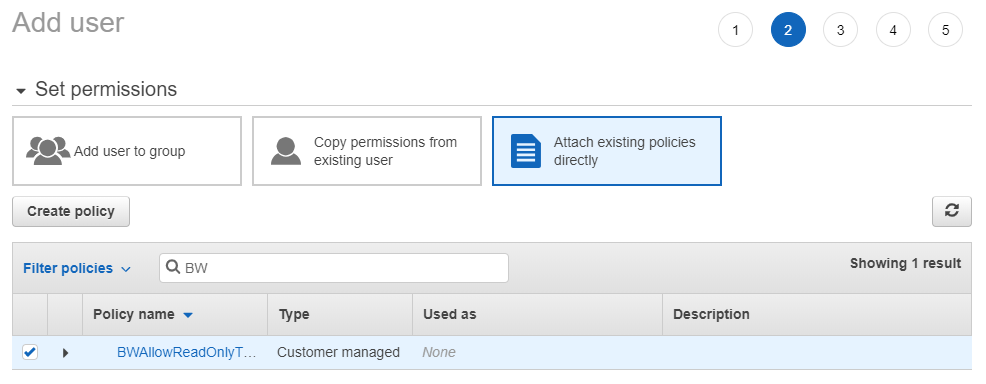
- On the Add user screen, select Attach existing policies directly
Click Create policy
- On the Create policy screen, select the JSON tab

- In the policy editor, paste the following, ensuring that <bucketname> is replaced with the name of the AWS S3 bucket created earlier
Note: This policy enables this read-only access to the AWS S3 bucket which contains billing data
{ "Version": "2012-10-17", "Statement": [ { "Effect": "Allow", "Action": [ "s3:Get*", "s3:List*" ], "Resource": [ "arn:aws:s3:::<bucketname>", "arn:aws:s3:::<bucketname>/*" ] } ] } - Click Next: Review policy

- On the Review policy screen, enter the following details:
- Name: A name for the policy
- Description: A description for the policy

- Click Create policy
- On the Add user screen, click the refresh button

- Select the policy which was just created

- Click Next: Tags
- On the Add user screen, enter the following details:
- Leave all settings as default

- Leave all settings as default
- Click Next: Review
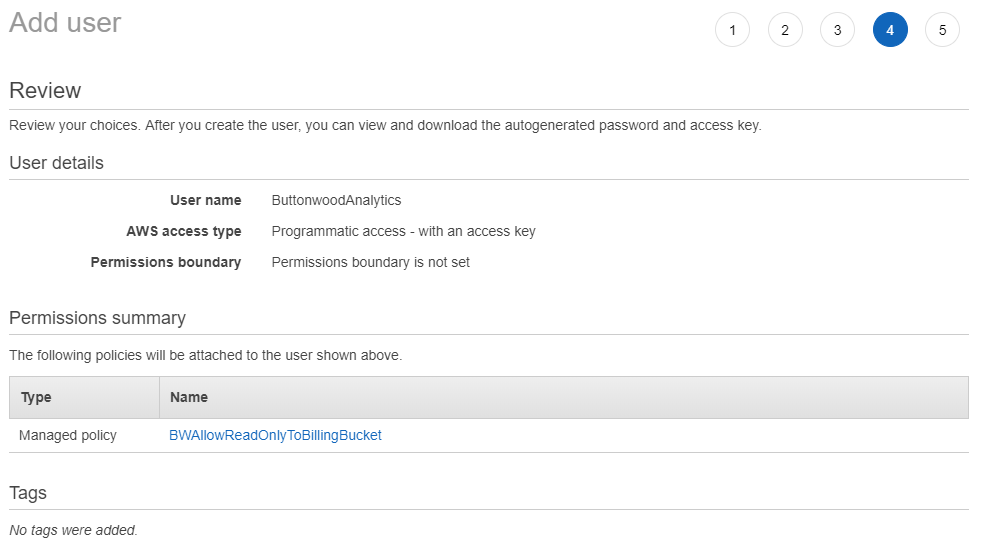
- On the Add user screen, review the configuration of the new user

- Click Create User
- Record the generated Access Key ID and Secret Access Key
Note: The credentials are only available at this time - if credentials are not recorded, they cannot be retrieved and new credentials must be created
- Optionally, click the Download .csv button and store the csv file in a safe location
- Click Close