Microsoft Azure is a platform that offers a collection of integrated cloud services – analytics, computing, database, networking, storage and web.
The Azure Plugin helps you discover, manage and report on all existing cloud resources currently deployed across all your Azure accounts. Blueprints can be modelled to harness the power of the Azure platform across leading cloud services for improved agility at the Lowest Cost Conforming Bid (LCCB).
Plugin Features
The following table lists the features provided by this plugin.
| Feature | Description |
| Accounts |
Ability to add Azure as a cloud provider Refer to the article Managing Service Provider Accounts |
| Blueprint Nodes |
Azure specific nodes appear in the blueprint canvas Refer to the article Blueprint Composer Nodes - Azure |
| Libraries |
Adds support for the following libraries:
Refer to the article Using Libraries |
Enabling the Plugin
- Log in to the Broker UI as an administrative user
- Navigate to Admin > Plugins
- Locate the Azure plugin tile - this appears under the Cloud Providers section
- If not already enabled, click the ellipses and select Enable


Note: The plugin may be enabled in a warning state if there are no provider accounts created - this is expected if this is the first time the plugin has been enabled - If required, add Azure accounts
- Click the Azure tile to access its settings
Settings
The Settings tab lists the configuration parameters for the plugin.

The following table lists the available parameters and their functions.
| Section | Setting | Description |
| ARM Default | Managed Availability Set SKU |
The SKU to use for managed Availability Sets. Default: aligned |
| Minimum OS Disk Size For Linux (GB) |
Default minimum provisioned size of the OS disk for a Linux virtual machine. Default: 0 |
|
| Minimum OS Disk Size For Windows (GB) |
Default minimum provisioned size of the OS disk for a Windows virtual machine. Default: 0 |
|
| Advanced | Windows Remote Access Protocol |
The selected method of managing deployed Windows virtual machine instances. Default: SSH |
| Region Exclusion List |
A comma-separated list of AWS region codes which will always be excluded from use. Default: chinanorth, chinaeast, usgovtexas, usgoviowa, usdodcentral, usdodeast, usgovvirginia, usgovarizona |
|
| API Connection Timeout (Seconds) |
The CONNECT timeout on the Azure API HTTP client in seconds Default: 20 |
|
| API Read Timeout (Seconds) |
The READ timeout on the Azure API HTTP client in seconds Default: 20 |
|
| Enable Shared Resource Groups |
Enables the use of shared resource groups. Default: Disabled |
|
| Allow ARM Deployment nodes |
Enables the use of ARM Deployment nodes on the Blueprint Composer. Default: Disabled |
Named Networks
Named Networks allows friendly names to be assigned to a network mappings.
As subnets are unique to each Azure VNet, named networks are mapped to subnets within a VNet, allowing the flexibility of using a single blueprint to be deployed across multiple environments. Using Named Networks also allows virtual machine instances within a blueprint to be attached to multiple subnets.
Where a blueprint doesn't use Named Networks, a default Named Network always exists where instances are deployed.

The following management operations are available for Named Networks:
- Add
- Edit
- Remove
Note: The default Named Network can be edited but not removed
Example
In this example, the following two Named Networks have been created, which are in addition to the default Named Network:
- App Servers
- DB Servers
The network mappings for this VNet have been updated so that:
- Any virtual machine instance not attached to a Named Network will be deployed into the 10.0.0.0/20 subnet of the VNet
- Any virtual machine instance attached to the App Servers Named Network will be deployed into the 10.0.0.0/20 subnet of the VPC
- Any virtual machine instance attached to the DB Servers Named Network will be deployed into the 10.0.0.0/20 subnet of the VPC - in this case this is the same network as the above, but can be a different subnet

The blueprint is designed to deploy two Windows VMs - one of which can now be attached to the App Servers Named Network, and the other attached to the DB Servers Named Network.

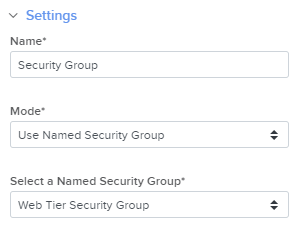
Named Security Groups
Named Networks allows friendly names to be assigned to a security groups.
As security groups are unique to each Azure region, named security groups are mapped to security group IDs within a region, allowing the flexibility of using a single blueprint to be deployed across multiple environments. Using Named Networks also allows virtual machine instances within a blueprint to be attached to multiple security groups.
Where a blueprint doesn't use Named Security Groups, a deployment security group will be created with default management ports allowed.

The following management operations are available for Named Security Groups:
- Add
- View
- Remove
Example
In this example, the following two Named Security Groups have been created:
- Web Tier Security Group
- Database Tier Security Group

The named security groups are mapped to existing security groups within the Azure regions.

The blueprint is designed to deploy two Windows VMs - one of which can now be attached to the Web Tier Security Group Named Security Group, and the other attached to the Database Tier Security Group Named Security Group.
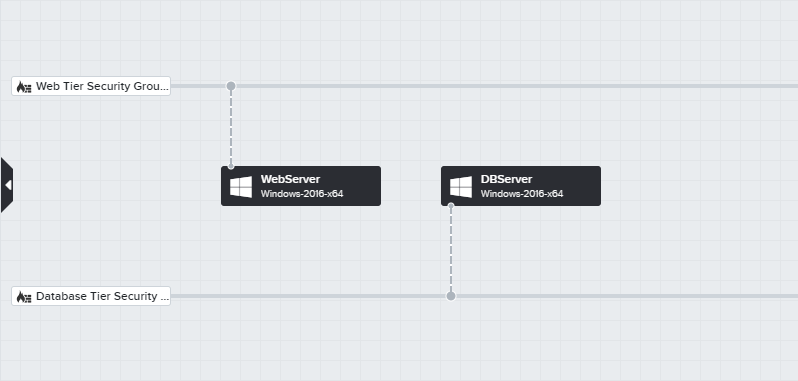
The blueprint also configured the Security Group nodes to use Named Security Groups.
Name Generation
Name Generators are templates which control how deployed resources are named. Refer to the article Managing Name Generators for more information and detailed steps in managing Name Generators.
The following resource types are supported by Name Generators for Azure:
- Virtual Machines
- Linux
- Windows
- Resource Groups
- Azure SQL Server

Click the View button to review and select the Name Generator to use for the selected resource type.
The <DEFAULT> naming of resources uses the following template for name generation:
D${Deployment.id}-${Node.id}